Tagged: zadig
Содержание:
- IMPORTANT: WINDOWS XP USERS, PLEASE DOWNLOAD THE _XP VERSION:
- SDR-RADIO V2 Setup Up Guide (Tested on Win XP and above)
- Equipment Guide
- HDSDR Setup Guide (Tested on Win XP and above)
- Next Steps
- CubicSDR Set Up Guide (Tested on XP and above)
- Other SDR Windows Software Compatible with RTL-SDR
- Getting Started on Linux
- Getting Started on OSX
IMPORTANT: WINDOWS XP USERS, PLEASE DOWNLOAD THE _XP VERSION:
v2.0.1.161:
- Zadig is now provided as an LZMA compressed executable
- default driver extraction directory is now %USERPROFILE%\usb_driver\
- embedded drivers: WinUSB v6.1.7600.16385, libusb-win32 v1.2.6.0 & libusbK v3.0.6.0
v2.0.1.160:
- Zadig is now provided in 2 versions: One for XP users that includes KMDF/WDF 1.09 and one for Vista, Windows 7 and Windows 8 users that includes KMDF/WDF 1.11. Make sure you pick the right one!
- libusb-win32 should now install the libusbK DLL. This is needed for libusbx applications using libusb-win32.
- embedded drivers: WinUSB v6.1.7600.16385, libusb-win32 v1.2.6.0 & libusbK v3.0.5.16
v2.0.1.159:
- token release to align with libwdi v1.2.2
- binary build compiler upgradded to gcc v4.7 (MinGW-w64)
- embedded drivers: WinUSB v6.1.7600.16385, libusb-win32 v1.2.6.0 & libusbK v3.0.5.16 — KMDF 1.11
v2.0.1.157:
- Note that the use of KMDF v1.11 may require a reboot the first time it is installed on Windows 7. If that is the case, a Windows popup will appear prompting you to reboot. Please pay attention to it!
- embedded drivers: WinUSB v6.1.7600.16385, libusb-win32 v1.2.6.0 & libusbK v3.0.5.16 — KMDF 1.11
v2.0.1.154:
- minor fixes (Clang static-analyzer warnings)
- embedded drivers: WinUSB v6.1.7600.16385, libusb-win32 v1.2.5.0 & libusbK v3.0.4.0 — KMDF 1.9
v2.0.1.152:
- fixed memory leaks
- fixed «could not reset device list» error message
- updated file properties
- updated for libwdi v1.2.1
- embedded drivers: WinUSB v6.1.7600.16385, libusb-win32 v1.2.5.0 & libusbK v3.0.4.0 — KMDF 1.9
v2.0.0.151:
- Zadig executable is now digitally signed
- fixed arrow tooltip not being displayed
- fixed potential issues reported by Clang static-analyzer
- embedded drivers: WinUSB v6.1.7600.16385, libusb-win32 v1.2.5.0 & libusbK v3.0.4.0 — KMDF 1.9
v2.0.0.150:
- New GUI
- libusb-win32’s filter driver support
- fixed extraction directory selection
- embedded drivers: WinUSB v6.1.7600.16385, libusb-win32 v1.2.5.0 & libusbK v3.0.4.0 — KMDF 1.9
v1.1.1.144
- changed WinUSB installation category to match Windows 8’s («libusb (WinUSB) devices» -> «Universal Serial Bus Devices»)
- embedded drivers: WinUSB v6.1.7600.16385 (KMDF 1.9), libusb-win32 v1.2.5.0 & libusbK v3.0.3.0 — KMDF 1.9
v1.1.1.143
- improved USB 3.0 HUB detection
- embedded drivers: WinUSB v6.1.7600.16385 (KMDF 1.9), libusb-win32 v1.2.5.0 & libusbK v3.0.3.0 — KMDF 1.9
SDR-RADIO V2 Setup Up Guide (Tested on Win XP and above)
To install SDR-RADIO for the RTL-SDR follow the steps below
- Purchase an RTL-SDR dongle. The cheapest and best for most applications is the R820T/R820T2 dongle. Information on purchasing one can be found here.
- Plug in your dongle and do not install any of the software that it came with, but ensure you let plug and play finish trying to install it. If you’ve already installed the software drivers it came with previously, uninstall them first.
- Go to http://zadig.akeo.ie/ and download Zadig.
- In Zadig, go to Options->List All Devices and make sure this option is checked.
- Select «Bulk-In, Interface (Interface 0)» from the drop down list. Ensure that WinUSB is selected in the box next to where it says Driver. (Note on some PCs you may see something like RTL2832UHIDIR or RTL2832U instead of the bulk in interface. This is also a valid selection). (Do not select «USB Receiver (Interface 0)» however).
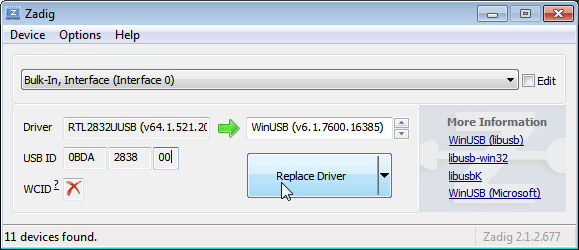
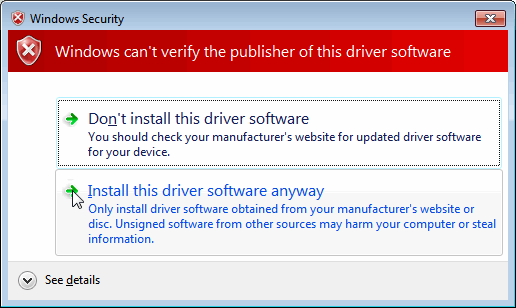
- Click Install Driver. You might get a warning that the publisher cannot be verified, but just accept it by clicking on Install this driver software anyway. This will install the drivers necessary to run the dongle as a software defined radio. Note that you may need to run zadig.exe again if you move the dongle to another USB port, or want to use two or more dongles together.
- Download the SDR-RADIO installer from http://v2.sdr-radio.com/Software/Download1.
- Use the installer to install SDR-RADIO.
- Download the RTL-SDR support package from the link at http://m3ghe.blogspot.com.au/p/adding-support-for-rtl-sdr-usb-dongles.html ().
- Extract the SDRSourceRTL2832U.dll, rtlsdr.dll and libusb-1.0.dll files from the x64 folder into the C:\Program Files\SDR-RADIO-PRO.com folder. Or if you have a 32-bit PC extract the files from the x32 folder into C:\Program Files (x86)\SDR-RADIO-PRO.com folder.
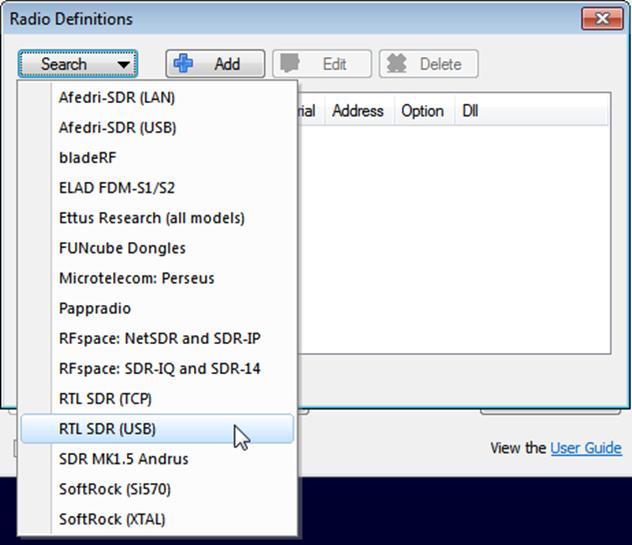
- Open SDR-RADIO. Upon opening it you will be greeted with the Select Radio screen and a prompt saying “List is empty – add radio definition now?” Click Yes. If this prompt does not display, click the + Definitions button.
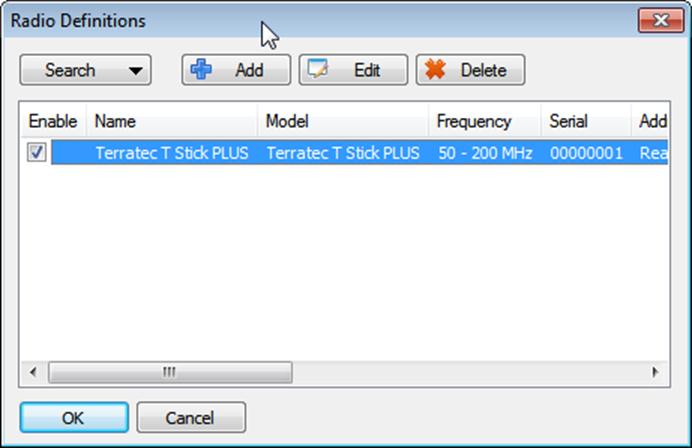
- In the new window open the Search drop down menu and select RTL SDR (USB). After clicking it the RTL-SDR will be added to the Radio Definitions list. Click OK.
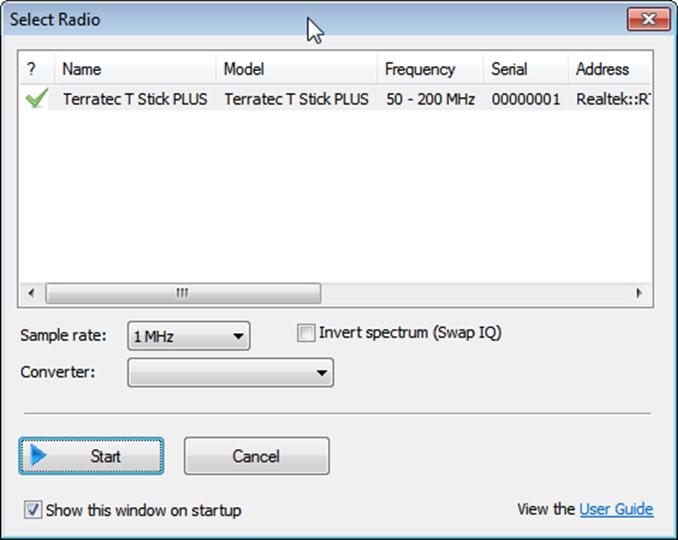
- Click on the RTL-SDR click to select it, choose your desired sample rate then click Start.
- Click on the Span button and adjust the span to the sample rate bandwidth you chose in the last step. This will let you see the whole spectrum.

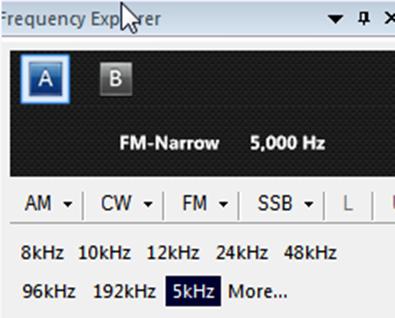
- To change the receive mode use the left menu under the frequency tab. You can also change the signal bandwidth here. NFM signals are typically around 12 kHz wide and broadcast FM is typically around 192 kHz wide.
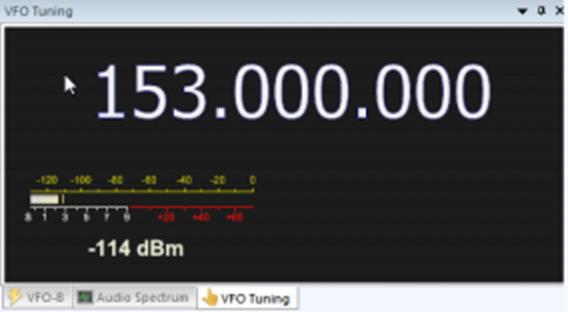
- To adjust the frequency, use the VFO tuning box on the right side. If you don’t see it you may need to click on the VFO tuning tab. Also if the screen is too small you may need to expand it’s size to show it. You can also click on the waterfall to instantly tune to the clicked frequency.
- Be sure to adjust the gain settings using the RF gain button in the top which is under the Home tab. By default it is set to automatic.
- Also to adjust the waterfall colors so that signals are more clearly seen go to the Display tab up the top and then click on the Automatic Calibration button on the very top right.
Equipment Guide
Currently, the most common RTL-SDR dongle is the R820T/R820T2 which usually sells for around $20 USD. See the Buy RTL-SDR dongles page for more information on purchasing.
Generally at least a dual core processor will be required to run most SDR software smoothly. Some command line software and ADS-B decoders may work on less powerful hardware.
To get the most enjoyment out of RTL-SDR you will need a decent antenna. Our packages that come with the dipole antenna set are a great start. Be sure to get them up high and outside (during good weather only) for best results. Units not sold by us may come with a smaller fixed length whip antenna that is okay for testing, but overall is not that great. The most recommended outdoor antenna for general scanning is a discone due to their wide band receiving properties. You can also cheaply build a wideband planar disk antenna (pdf warning) out of some metal pizza pans.
HDSDR Setup Guide (Tested on Win XP and above)
- Purchase an RTL-SDR dongle. The cheapest and best for most applications is the R820T/R820T2 dongle. Information on purchasing one can be found here.
- Plug in your dongle and do not install any of the software that it came with, but ensure you let plug and play finish trying to install it. If you’ve already installed the software drivers it came with previously, uninstall them first.
- Go to http://zadig.akeo.ie/ and download Zadig.
- In Zadig, go to Options->List All Devices and make sure this option is checked.
- Select «Bulk-In, Interface (Interface 0)» from the drop down list. Ensure that WinUSB is selected in the box next to where it says Driver. (Note on some PCs you may see something like RTL2832UHIDIR or RTL2832U instead of the bulk in interface. This is also a valid selection). (Do not select «USB Receiver (Interface 0)» however).
- Click Install Driver. You might get a warning that the publisher cannot be verified, but just accept it by clicking on Install this driver software anyway. This will install the drivers necessary to run the dongle as a software defined radio. Note that you may need to run zadig.exe again if you move the dongle to another USB port, or want to use two or more dongles together.
- Download HDSDR from http://hdsdr.de/, using the download button at the bottom of the page.
- Use the installer you just downloaded to install HDSDR.
- Go to http://hdsdr.de/hardware.html and download the ExtIO_RTL2832U.dll dll file from the table entry «RTLSDR (DVB-T/DAB with RTL2832) USB» (Direct Link).
- Copy the ExtIO_RTL2832U.dll file into the HDSDR install folder which is by default set to C:\Program Files (x86)\HDSDR.
- Open HDSDR. You might be asked to select a .dll file. Choose the ExtIO_RTL2832U.dll file you just copied over and then click Open. It is okay if you do not see this screen as long as you have copied the ExtIO_RTL2832U.dll file over properly in the last step.

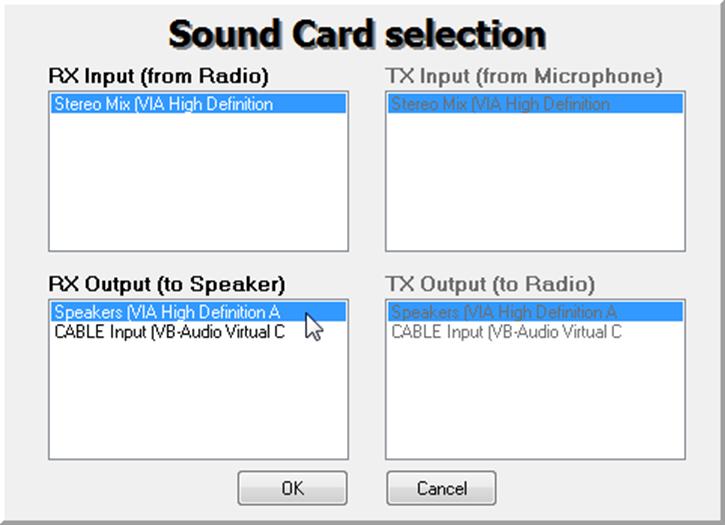
- Choose your output sound card by clicking on the Soundcard button in the bottom left corner, or alternatively by pressing F5. The only important setting here is the “RX Output (to Speaker)” setting which you should set to your speakers, or desired audio piping software.
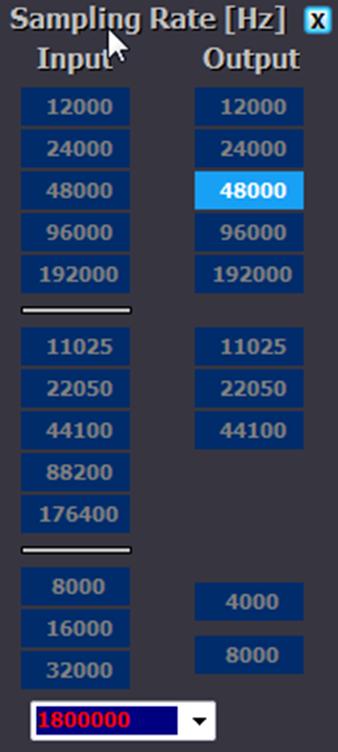
- Click on the Bandwidth button or alternatively press F6. Choose an output Sampling Rate of 48000 Hz for general NFM signals, or choose 192000 for wideband FM signals, like broadcast FM.
- Press Start or alternatively press F2. This will start the SDR.
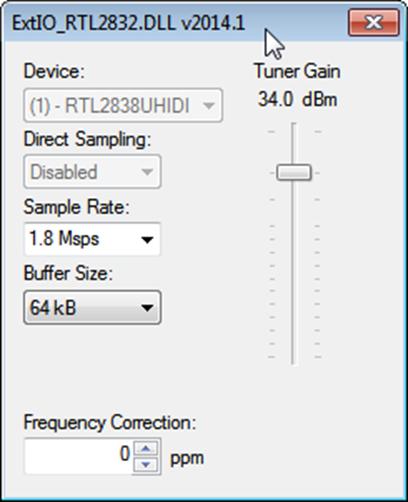
- To set the RTL-SDR sample rate, gain and frequency correction click on the ExtIO button .
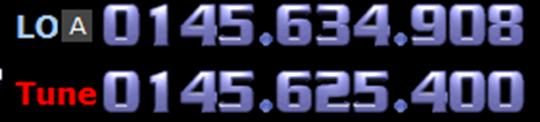
- To tune to a station, change the Local Oscillator frequency to a frequency near the frequency you are interested in. Then tune to the desired frequency either by clicking in the RF spectrum, or using the Tune numbers.
- You can zoom in and out of the spectrum by using the Zoom slider which is to the left of the word zoom.

- The mode can be altered by clicking on the mode buttons.

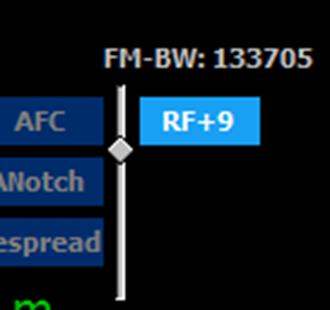
- After clicking on the FM mode button, the FM bandwidth can be manually modified with the FM-BW slider.
- To listen to a typical wideband broadcast FM station, you will need to change the audio sampling rate to 192000 Hz. Do this by clicking on the Bandwidth button or alternatively by pressing F6 and then selecting the output sampling rate as 192000 Hz.
Next Steps
After getting your RTL-SDR set up with SDR# we recommend investigating the following:
- If you are using a RTL-SDR.com V3 dongle, view our V3 users guide to learn how to use the special features like HF direct sampling and the bias tee.
- Read our SDR# Users Guide to learn what each setting in SDR# does.
- Check out all our featured articles on this blog for various RTL-SDR related projects and tutorials.
- Upgrade from the stock antenna. For optimal reception you should use an outdoor roof mounted antenna. The optimal antenna will depend on the frequency and project you are interested in, but for a general all purpose antenna we recommend a Discone or planar disk antenna (pdf).
- If you are using your RTL-SDR for HF with direct sampling mode or an upconverter then we recommended using SDR# with the special decimation drivers. This will allow you to zoom in on the small bandwidth signals used on HF without loosing resolution.
- Check out our store for various RF accessories such as filters, LNA’s and antennas.
CubicSDR Set Up Guide (Tested on XP and above)
Warning: CubicSDR is software that is in alpha stages of development. That said, at the moment it is fairly stable and quite easy to set up.
- Purchase an RTL-SDR dongle. The cheapest and best for most applications is the R820T/R820T2 dongle. Information on purchasing one can be found here.
- Plug in your dongle and do not install any of the software that it came with, but ensure you let plug and play finish trying to install it. If you’ve already installed the software drivers it came with previously, uninstall them first.
- Go to http://zadig.akeo.ie/ and download Zadig.
- In Zadig, go to Options->List All Devices and make sure this option is checked.
- Select «Bulk-In, Interface (Interface 0)» from the drop down list. Ensure that WinUSB is selected in the box next to where it says Driver. (Note on some PCs you may see something like RTL2832UHIDIR or RTL2832U instead of the bulk in interface. This is also a valid selection). (Do not select «USB Receiver (Interface 0)» however).
- Click Install Driver. You might get a warning that the publisher cannot be verified, but just accept it by clicking on Install this driver software anyway. This will install the drivers necessary to run the dongle as a software defined radio. Note that you may need to run zadig.exe again if you move the dongle to another USB port, or want to use two or more dongles together.
- Go to cubicsdr.com and go to the downloads page. Find the download link for the latest version. Download the version suitable for your particular version of Windows.
- Run the CubicSDR installer.
- Plug in your dongle and run CubicSDR from your start menu.
- You will be greeted with a SDR Devices menu. Choose your RTL-SDR from the menu and click on the «Use Selected» button.
- CubicSDR will automatically start.
- Click anywhere on the waterfall to start listening.
Other SDR Windows Software Compatible with RTL-SDR
See the Software Guide for a big list of other compatible RTL-SDR software.
Getting Started on Linux
For Linux we first recommend having a look at Ranous’ Linux Quickstart guide document which can be found here (pdf).
The easiest way on most Debian Linux systems is to install rtl-sdr via apt-get. This can be done with the following commands. We recommend using the most modern version of Linux OS that you can find for your system to get the latest drivers.
sudo apt-get update
sudo apt-get install rtl-sdr
Instructions for installing the RTL-SDR drivers manually from source can be found at http://sdr.osmocom.org/trac/wiki/rtl-sdr. Repeated below is the code:
sudo apt-get install libusb-1.0-0-dev git cmake
git clone git://git.osmocom.org/rtl-sdr.git
cd rtl-sdr/
mkdir build
cd build
cmake ../ -DINSTALL_UDEV_RULES=ON
make
sudo make install
sudo cp ../rtl-sdr.rules /etc/udev/rules.d/
sudo ldconfig
After installing the libraries you will likely need to unload the DVB-T drivers, which Linux uses by default. To unload them temporarily type «sudo rmmod dvb_usb_rtl28xxu» into terminal. This solution is only temporary as when you replug the dongle or restart the PC, the DVB-T drivers will be reloaded. For a permanent solution, create a text file «rtlsdr.conf» in /etc/modprobe.d and add the line «blacklist dvb_usb_rtl28xxu». You can use the one line command shown below to automatically write and create this file.
echo 'blacklist dvb_usb_rtl28xxu' | sudo tee --append /etc/modprobe.d/blacklist-dvb_usb_rtl28xxu.conf
Now you can restart your device. After it boots up again run «rtl_test» at the terminal with the RTL-SDR plugged in. It should start running.
NOTE: Some devices like the Orange Pi zero have a bug in their current mainline OSes. Instead of blacklisting «dvb_usb_rtl28xxu», you will need to blacklist «dvb_usb_rtl2832u». If you installed rtl-sdr by «apt-get», you will need to update the black list file at /etc/modprobe.d/rtl-sdr-blacklist.conf manually too.
After installing the libraries and black listing the DVB-T drivers we recommend starting off with GQRX, a SDR program similar in operation to SDR#. It can be downloaded via the package manager in your Linux distribution or from http://gqrx.dk/download. We can now also recommend the multi-platform CubicSDR which can be downloaded from http://www.cubicsdr.com/.
If you want to install GNU Radio we recommend using Marcus Leech’s script by typing the following into terminal. This installs the RTL-SDR drivers as well.
wget http://www.sbrac.org/files/build-gnuradio && chmod a+x ./build-gnuradio && ./build-gnuradio
Note that if you want to run Linux in a virtual machine it has been reported that RTL-SDR performance with VirtualBox is rather poor due to it’s slow USB connection. VMWare Player on the other hand has good performance — just remember to set the USB controller to use the USB 2.0 protocol as by default it is set to USB 1.1.
Another good Linux quick start guide written by Kenn Ranous can be found here (pdf).
Getting Started on OSX
As there is a severe lack of SDR software for OSX, we recommend using either Linux or Windows. However, GQRX is a SDR program that works well on OSX.
We can now also recommend the multi-platform CubicSDR which can be downloaded from cubicsdr.com.
|
For a comprehensive book about the RTL-SDR you may be interested in our book available on Amazon. Available in physical and eBook formats. |